

Buying bees is expensive. Purchasing a “package” (a queen plus 3 pounds of workers) can cost more than $150 and you have to place your order months in advance. But, if you are willing to put in some hard work and take a few chances, you can get a full colony of bees for free – including brood comb, pollen stores, and honey. It’s how I filled my first beehive.
When a swarm of bees moves into a structure, like the wall cavities or joist bays of a house, somebody has to cut open the walls and get them out. This process is called a “Cut-Out.” It is unpleasant work and mostly handled by experienced beekeepers.
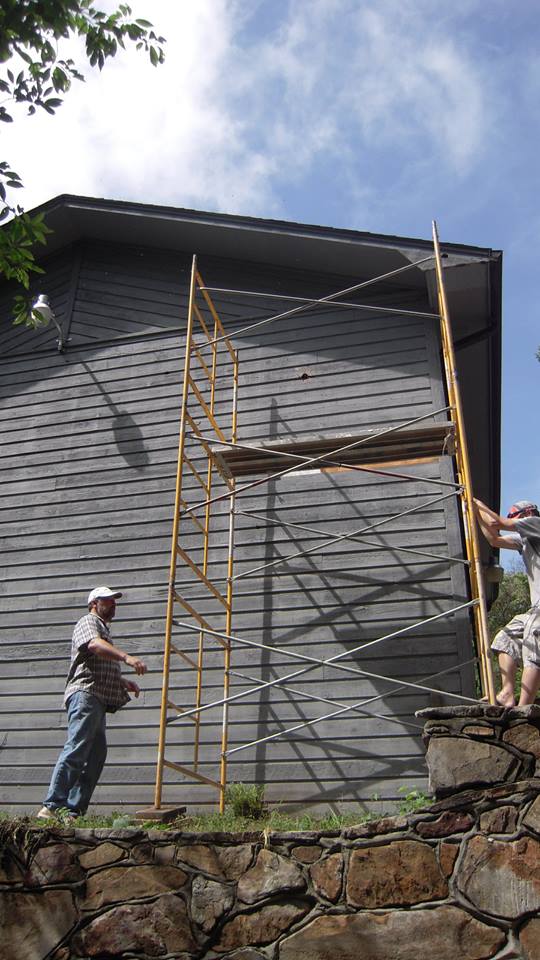
The year I decided to start beekeeping I learned that friends of mine had a colony of bees living in the wall of their house. They didn’t want the bees to die, so they agreed to let me remove them (and said they would take responsibility for repairing the wall afterward.) The only catch was that the wall where the colony was located was about 18 feet off the ground, so this was a uniquely challenging project for a first-timer.
My plan was to cut out the colony and move them into my newly completed top bar hive. Since this colony was well established (they’d been there for 2 years), I expected them to have a good queen, plenty of brood, and a fair amount of stored honey. The honey would be harvested and the bees and brood comb would get transferred into the new hive.
Step One: Research
Of all the ways to get bees for your hive, cutting a colony out of the wall of a residential home is probably the hardest. Reasonable people do not do this, but luckily I am not such a person. I possess an optimistic can-do attitude, access to the Internet, and no known allergies to bee stings. So, it was game on!
Since I’d never done this before, my first step was to do some research. I needed to learn the answers to the following questions:
- How do I capture the bees for relocation?
- How do I remove the comb from the walls?
- How do I attach the comb to my top bars?
- How do I keep from getting stung 10,000 times by pissed off bees???
I came across 2 people on YouTube who provided extremely helpful information. The first was a beekeeper named McCartney Taylor who published a book on swarm traps and bait hives and has a lot of fantastic information on his YouTube channel (Out of a Blue Sky) about keeping bees in top bar hives. In particular he has a video on advanced comb management that gave me a strategy for attaching the comb to my top bars.
The second person I discovered is a man who goes by the handle JP the Bee Man. JP does a lot of colony removal work in a variety of locations. He also does a great job documenting the process. He has a number of videos showing how he removes bees from walls and he usually takes time in each video to explain the unique challenges of the location, discuss his strategy for the removal job, and then he rolls camera while he works. One thing I like about his videos is that he speeds up the video of him working, but doesn’t cut out much of the process. He also slows down and explains any unusual things he encounters.
The answers I arrived at for my critical questions were that I needed to make a ‘bee vacuum’ to suck up as many worker bees as possible before I started cutting the comb loose.
I planned to use a flexible bread knife to cut the comb away from the walls. I would use large hair clips secured with zip ties to attach the brood comb to the top bars (honey would get harvested and drone comb would get tossed.)
And finally, even though JP usually works without protective gear, I would have a bee jacket with a veil and rubber gloves on while I worked (even JP keeps protective gear on the truck for those times when he runs across an aggressive colony.)
Step Two: Mapping Out a Bee Removal Strategy
After all of my research, here was my basic plan for the removal process:
I would smoke the entrance and then use my oscillating saw to slowly cut open the wall and expose the hive.
Once the hive was open, I would use a bee vacuum to gently capture as many workers as I could to give me some room to work on the comb.
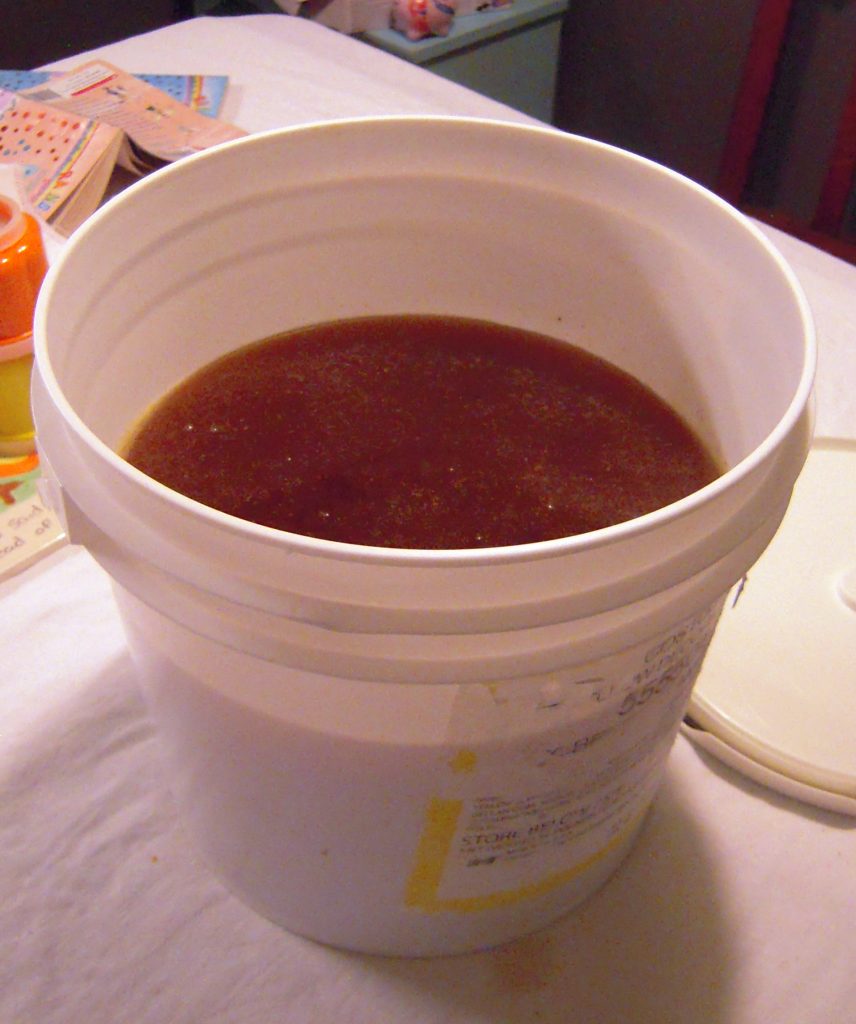
Next, I would start cutting away the comb. Capped honey would go into food-grade plastic buckets, brood comb would get secured into a small top bar bait hive, and drone comb would get tossed in the trash – sorry drones.
After the majority of the comb was removed, I would try to locate and capture the queen. If I successfully located the queen, then I would vacuum up as many remaining bees as possible and remove the rest of the comb. If I didn’t find her, I’d just pray that I somehow got her earlier with the vacuum.
Once all the comb was removed from the wall, I would scrape out as much wax as possible, wipe down the wall to remove the honey and nectar that dripped out during the process, and mist down the wall with a strong mint tea mixture (I was told that bees don’t like it, so it should deter them from returning – I later discovered that artificial almond extract does a better job.)
Finally, I secured and covered the bait hive and loaded up my gear to head home. If I got home early enough, I would transfer the bees to the main hive the same day. Otherwise, I’d make the transfer the following day.
Of course, no plan survives first contact with the bees. I might get stung 1,000 times, fall off the scaffold, and end up in the ER. But, at the very least I had a plausible plan.
Step Three: Assembling My Bee Removal Gear
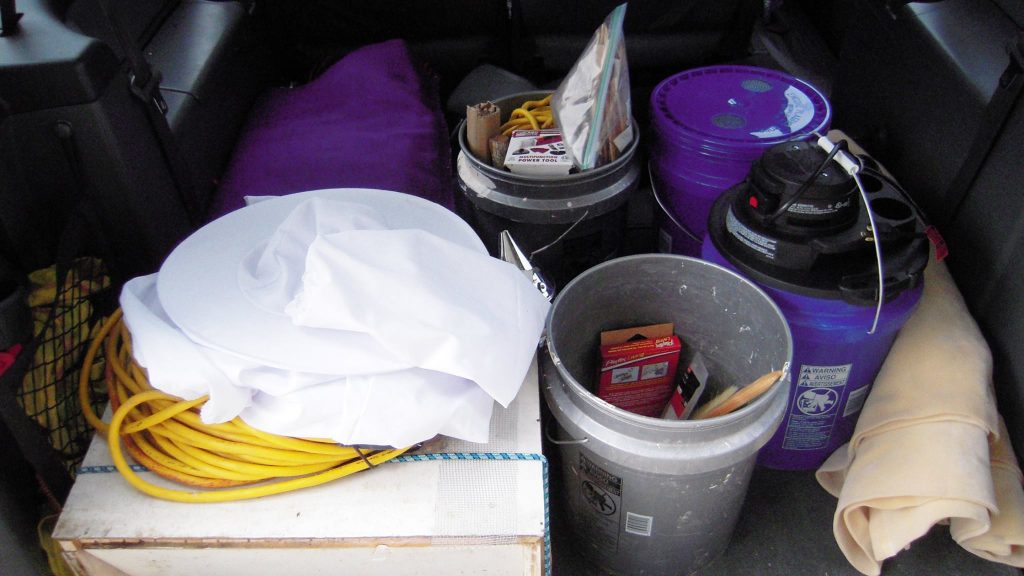
After countless hours of research, I put together a list of all the things I thought I would need to get this removal job done successfully. My friend was going to rent a scaffold (the bees were 2 stories up) and take care of repairing the wall after I was done. So my gear was focused on opening the walls, capturing the bees, and getting them into the hive. Here was my list:
- Oscillating Saw
- Scraper
- Bee Vacuum w/2 5-Gallon Plastic Buckets and Lids
- Bread Knife
- Bee Brush
- Smoker and Fuel
- Hair Clips
- Zip Ties
- 2 – 5-Gallon Food-Grade Buckets for Harvested Honey Comb
- Queen Clips
- Small Bait Hive
- Trash Bags
- Bee Jacket with Veil
- Rubber Gloves
- Duct Tape
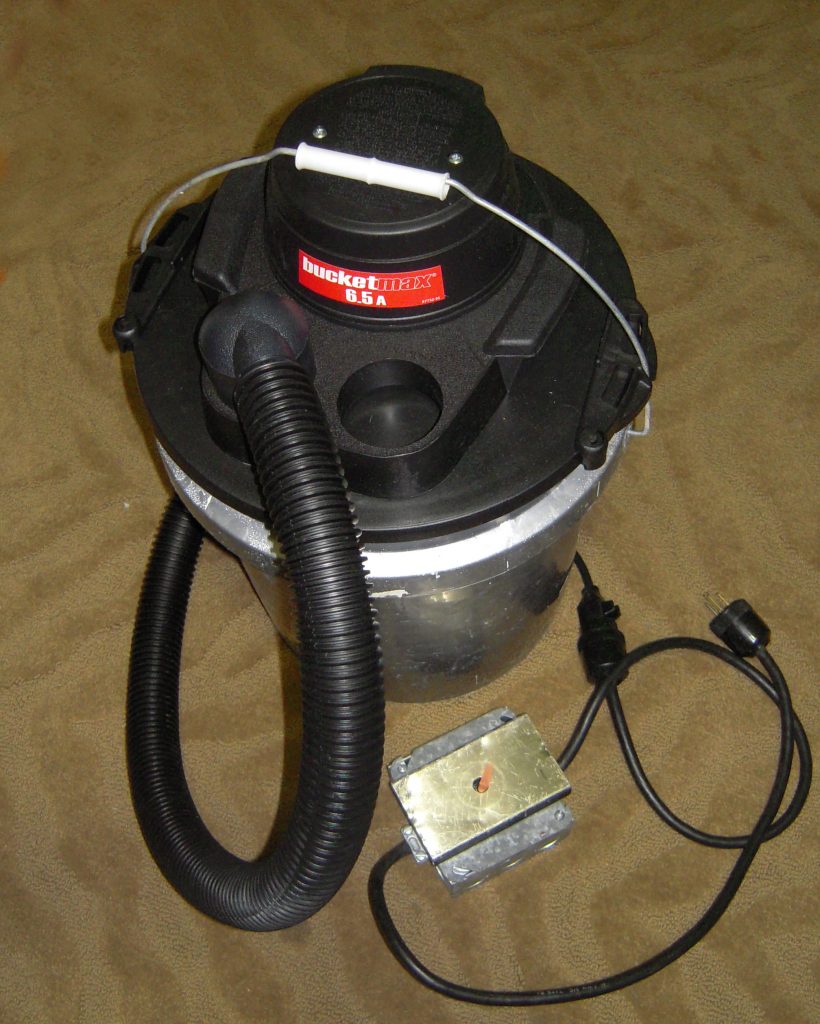
Most items on the list are pretty self explanatory. A bee brush is just a long thin horse hair brush that is gentle on the bees. The queen clip looks like a plastic hair clip with no teeth. If I successfully located the queen, this would help me ensure that she doesn’t get away before I moved her into the new hive. The bee vacuum was a home made deal consisting of a bucket head shop vac unit that sits on top of a 5-gallon bucket. I plugged it into a dimmer box to let me dial down the motor to reduce the suction and keep the bees from getting squashed when I suck them up. When the bucket filled up with bees, I’d give it a couple bumps on the ground to move the bees to the bottom, slip off the vacuum head, and slip on a cover with a screened vent. The bees would ride in the bucket until I got them home.
The After-Action Report
Now that you know my plans and the gear I assembled, it’s time to tell you what happened during my first “Cut-Out” bee removal. I’ll start with the good news, I successfully removed the colony and relocated the queen to the top bar hive in my yard and harvested 40 pounds of honey…
The bad news is that the colony struggled to rebuild their numbers through the summer and fall. Ultimately, they didn’t survive the winter. It was a great learning experience, and I got to share lots of tasty local honey with friends and neighbors.
So, What Happened?
Here’s a short video of me up on the scaffold during the process of removing the bees…
There is a famous saying that ‘no plan survives first contact with the enemy.’ In this case, everything followed the plan almost to perfection. But, the one thing that went wrong was really bad – more on that later.
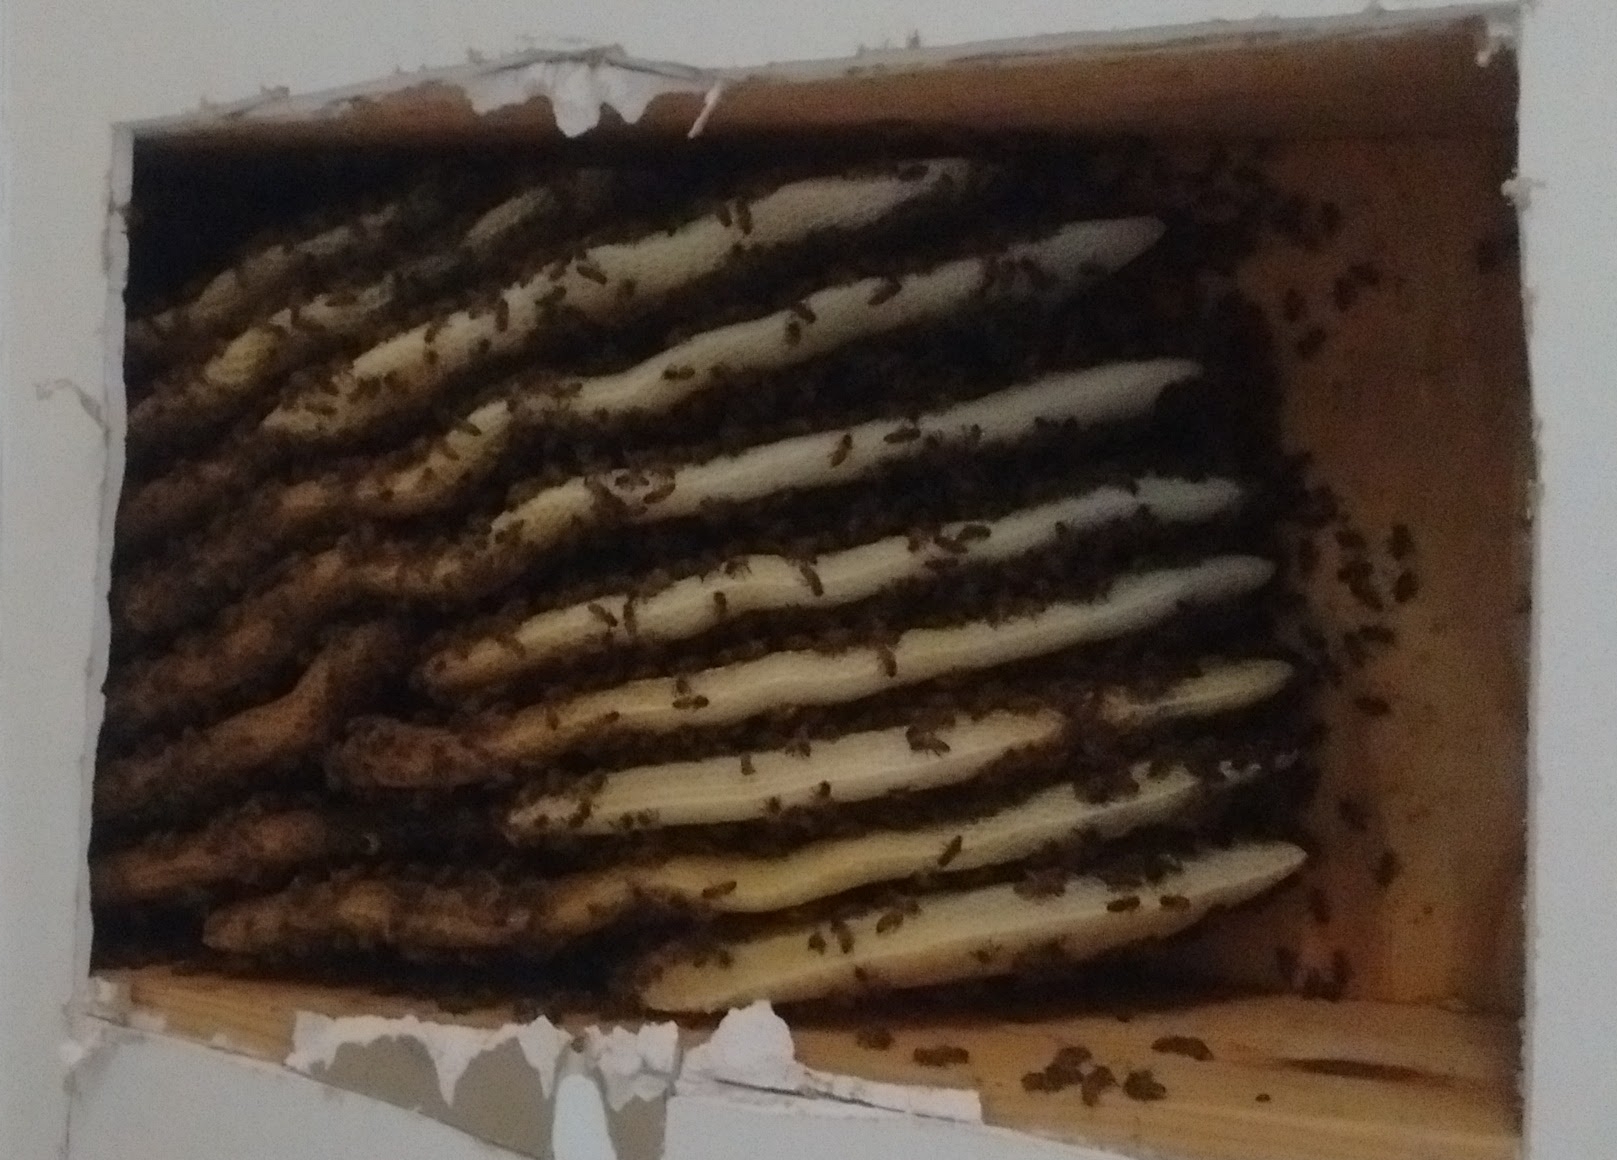
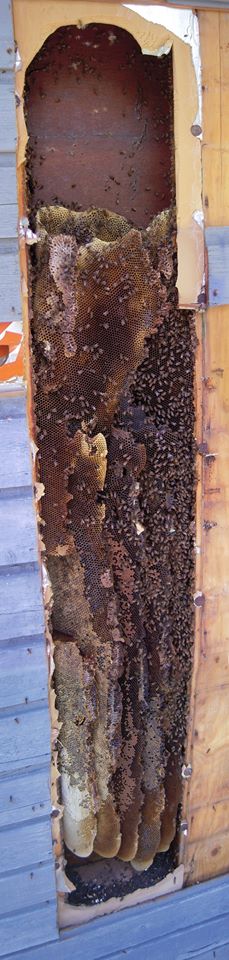
When I got to the house in the morning, I unloaded all my tools, inspected the wall, and got everything into position to start working. I opened the wall and discovered that the bees had made their home in one single wall cavity. The total space was about 1 foot wide and 8 feet tall, and the bees had filled up the vast majority of it.
Once the wall was opened up, I fired up my homemade bee vacuum and started clearing some of the bees from the hive to give myself a little room to work. Then, I grabbed my bread knife and started to cut away the comb. All of the sections of comb with capped honey were placed in a 5 gallon bucket with a lid. I used my brush to get as many bees off the comb before putting it in the bucket.
Bee Removal Is MESSY
I’m very glad I wore gloves. Once I started cutting into the comb, there was nectar everywhere. Uncapped honey in the sun on a hot day runs like water – very sticky water! I tried to lift out the comb in big chunks, but this hive was big and I had to cut it out in pieces and every cut seemed to unleash a fresh torrent of honey.
Uncapped honey in the sun on a hot day runs like water – very sticky water!
The messiness wasn’t a major problem, but the bee vacuum ended up being pretty sticky in spite of my stopping a number times to wash off my gloves.
Securing the Brood Comb
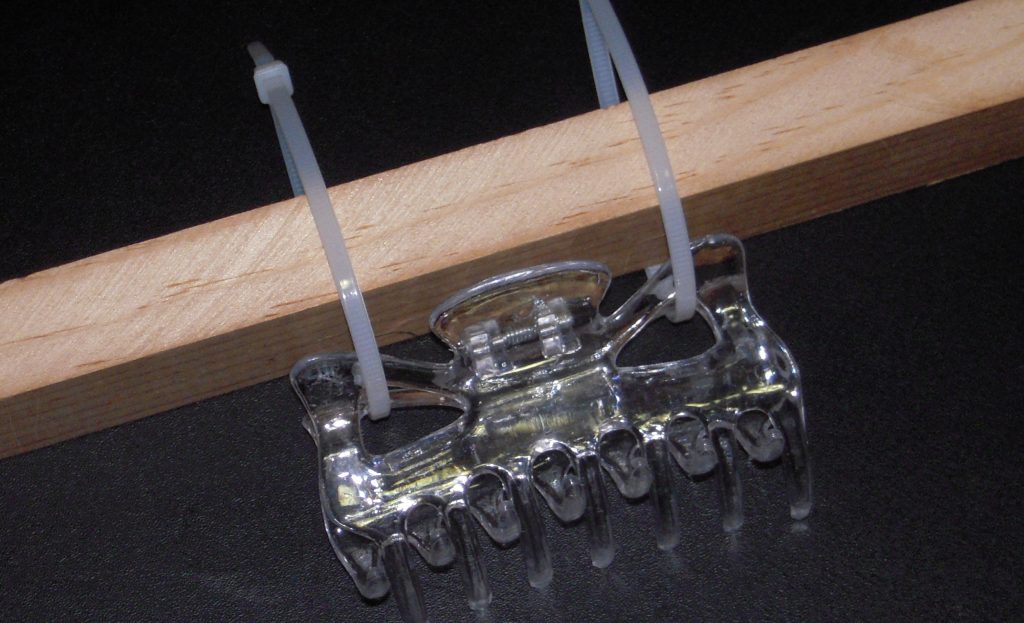
The plan to secure chunks of brood comb to my top bars with zip ties and hair clips worked like a charm (thank you McCartney Taylor!) I was able to transfer a significant amount of brood to the new hive. The process isn’t quite as elegant as rubber banding comb into a Langstroth frame like JP the Beeman, but it still went smoothly.
Any chunks of comb that didn’t contain capped honey or fit into the temporary hive were dumped into a bucket for disposal. I ended up with 2 5-gallon buckets crammed with discarded comb that I later melted down.
Finding the Queen Bee
From all my research I came to the conclusion that the queen would keep moving further back into the hive until I got close to the last section of brood comb. So, I didn’t worry about her as I alternated between vacuuming up bees and cutting out comb. Then, with only a little comb left in the wall, I slowed down and started hunting.
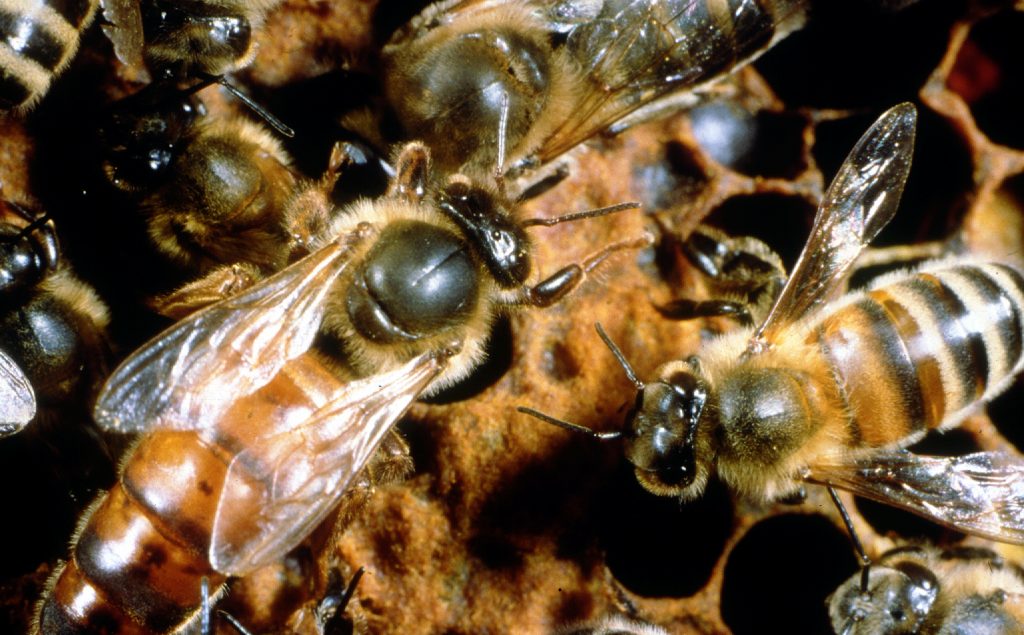
Now, I had never actually seen a real queen bee before in my life. So, I wasn’t sure if I would be able to find her. There were a good number of drones in the hive and, at first, I got excited when I saw one moving among the smaller worker bees. They are much bigger than the workers. But, their eyes are huge and there were bunches of them, so it didn’t take long to learn to recognize them.
When I finally found the queen, it was pretty easy to distinguish her from the workers. I grabbed my queen cage clip, snatched her up, and placed her in the temporary hive.
My Big Horrible No Good Mistake
Once I had the queen, I happily finished up the removal of the comb and started breaking down my gear to take home. I had prepared 2 5-gallon buckets to use with the bee vacuum. The plan was to vacuum up a good chunk of bees, then pull the vacuum head off the bucket and place a lid on it with big air holes cut in it. I did that with the first bucket and set it in the shade while I vacuumed bees into the second bucket. When I started cleaning up, I swapped the vented lid onto the second bucket and also put it in the shade.
Once I had cleaned up most of the gear, I went to check on the bees in the vented buckets. To my horror, I discovered that there was not enough ventilation and the bees had overheated and died. There was nothing inside but a soggy mat of dead bees on the bottom of each bucket. I needed a LOT more ventilation in those buckets – or, I should have transferred the bees to a large cardboard box for transportation. I modified my design and had much better success the next time I used the bee vacuum.
While I finished packing up, I left the temporary hive with the brood comb and queen open on the ground for a while so that foraging bees would be able to find the queen and settle inside before I closed it up for transport. There were lots of workers on the brood comb as I moved it to the temporary hive. My hope was that their numbers would be strong enough to recover from the losses due to my vacuum mistake.
Moving The Bees Into the New Hive
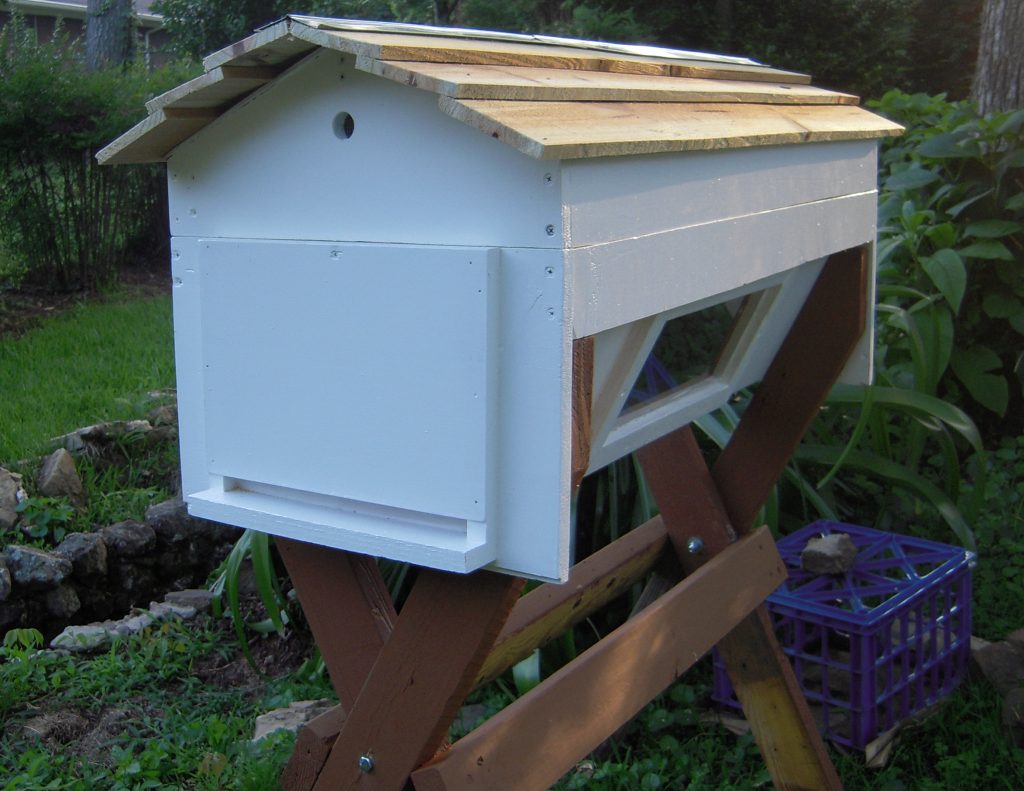
When I got back home it was getting late and a thunder storm was moving in. I decided to move the bees into the new hive in my back yard. I pulled the bars of brood comb out of the temporary hive and placed them into the top bar hive. The interior dimensions of my permanent and temporary hive were not a perfect match, so I had to trim off some of the brood comb to get everything to fit properly. The process went quickly and I had most of the bees in their new home by the time the rain came.
By morning the bees were orienting themselves to their new home and cleaning and repairing the damage done to the brood comb in the transition.
Here is a little video I shot through the observation window on the side of the hive…
My First Summer with Bees
Within a few days, the workers started bringing pollen into the hive and the queen started laying eggs. But, my first colony never recovered from the loss of the bees killed in the vacuum buckets. I don’t know how old the queen was, but she just didn’t seem able to make up for the losses.
I also discovered that there were hive beetles in the colony. I spent the summer trying to beat back the beetles, and I’m sure they further stressed the colony. There aren’t a lot of good tools for controlling hive beetles in a top bar beehive. Most beetle traps are designed to hang between the frames in a Langstroth hive or sit on top of the frames.
The bees survived well into the winter. But, we had a week of extremely warm weather just before Christmas, and some weeds in the area actually blossomed. I saw bees returning to the hive with pollen – they were acting like spring had arrived. Then, we got a week of really cold weather around New Years. The next warm day I inspected the hive and discovered that all the bees were dead. There was larva, capped brood, and emerging bees on the comb along with lots of nurse bees spread out over them. They all froze. And, there weren’t enough bees left to keep the queen warm, so they froze too.
What Happened Next
I continued to chase free bees. Each spring I put out a few swarm traps. I’ve done one more cutout project, but didn’t didn’t get the queen that time. However, one fine spring day a huge swarm of bees moved into an empty hive in my backyard and I they are still there a year later as I write this article.